Main Content
How to use Sophos Antivirus
- Sophos Antivirus user interface
- Automatic scanning for viruses
- Manual scanning and removal of files
- Computer and directory scanning
- Configuration of scans
- Automatic updates
- False alerts or viruses that are not viruses
Sophos Antivirus user interface
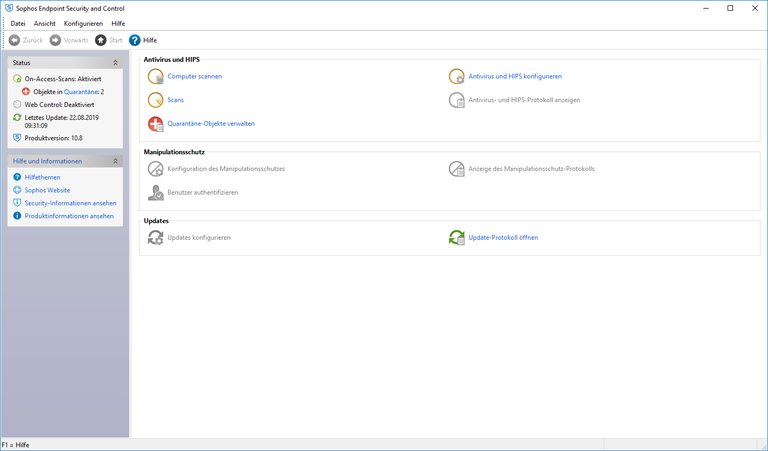
The virus scanner user interface (pictured left) can be launched from:
- the Windows Start menu (Start -> Sophos -> Sophos Endpoint Security and Control)
- The context menu of the virus scanner icon in the Windows taskbar (to be opened by right-clicking the icon in the system tray (Fig. bottom left)).
Automatic scanning for viruses
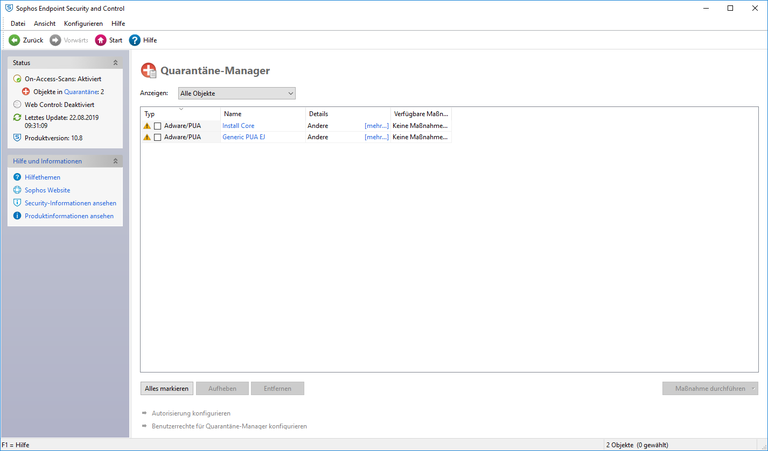
The virus scanner automatically scans all files as soon as they are accessed, e.g. via Windows Explorer (on-access scan). If a virus is detected in a file, the program places the file in "Quarantine"; i.e. the file can neither be executed (e.g. a program file) nor edited (e.g. a document).
All files considered infected are listed in the Sophos Anti-Virus user interface in the Quarantine Manager (shown above).
The Quarantine Manager is displayed by clicking on the "Manage quarantined items" item or the "Quarantined items" link.
Without administrator rights, files cannot normally be edited (deleted or cleaned) in the Quarantine Manager. However, you can delete the affected files e.g. in Windows Explorer (if necessary, do not forget to empty the Windows Recycle Bin).
See also Checking and removing files manually..
Checking and removing files manually
Starting the manual scan
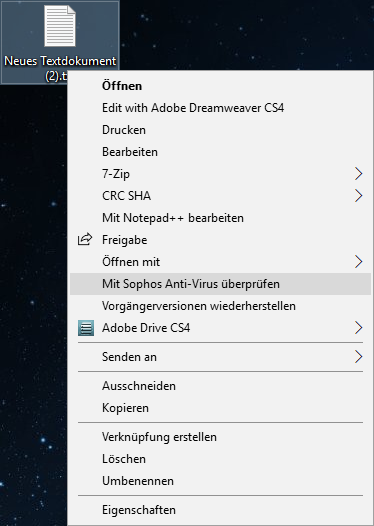
Individual files and folders can be scanned manually for viruses using the Windows Explorer context menu (right-click on File) (Fig. left) There, select the item "Scan with Sophos Anti-Virus". By default, if a virus infection is detected, the file is only placed in "Quarantine", i.e. access to the file is blocked. However, Sophos Anti-Virus offers the option to automatically clean or delete the files during scanning.
Configuring manual scanning
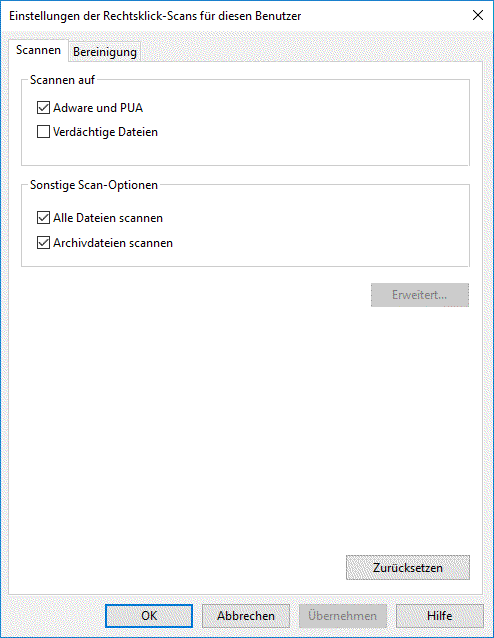
Scanning can be configured from the virus scanner's user interface. The settings window is opened via the menu item Configure -> Right-click scan (Fig. left).
Among other things, there are options there to:
- automatically clean (i.e. remove the virus from the file)
- delete
- move (the security setting of the University Computer Center installation does not allow users without administrator rights to move infected files!). The University Computer Center does not consider this setting to be useful.
For a detailed description of the setting options, see Configuring scans.
Computer and directory scanning
Sophos Anti-Virus provides the ability to scan all files on the computer or selected directories for viruses and other malware. In the user interface (Fig. left), these functions are available via the "Scan my computer", or "Available scans" links.
Scan my computer
This option scans all local hard disks of the computer for viruses. This check usually takes a very long time, since all directories and files (also for programs and the operating system) are checked. For this reason, this option is expressly recommended only in exceptional cases and after consultation with the responsible system administrators or PC hall supervisors. Instead, you should only check selected directories, e.g. your personal user directory, in the H: drive. To do this, you must first set up a "New scan".
Setting up a new scan
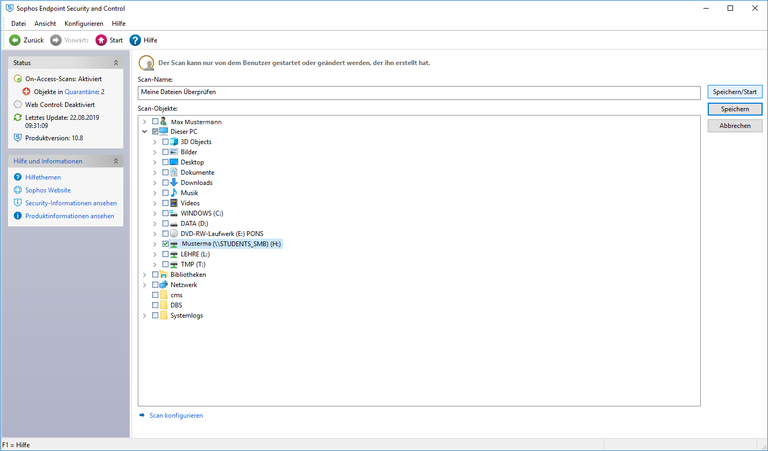
The link "Set up new scan" opens the settings window for scanning selected directories (Fig. left). The directories to be scanned are selected by checking the box to the left of the directory name. Subdirectories are displayed by clicking on the + symbol.
Under Scan name there should be a meaningful name, e.g. "Scan my files - delete infected data".
The "Configure this scan" link opens the Custom scan settings window. There you can configure how Sophos Anti-Virus deals with any infected files it finds. The default setting is that affected files are quarantined, i.e. they cannot be run, opened or edited.
There are options there to:
- automatically "clean up" (i.e. remove the virus from the file)
- delete
- move (the security setting of the University Computer Center installation does not allow normal users to move infected files, so this option should not be chosen).
The scan can be either saved and started right away, or canceled (all settings are discarded). Saved scans are listed in the main window (see above, fig. User interface) under "Available scans". There they can be started, edited or also deleted at any time.
A detailed description of the setting options can be found under "Configuration of checks".
Examples
Checking your own files
User John Doe wants to regularly check his data for viruses. However, John does not want the program to try to clean or even delete his data if necessary. It should only list possibly affected files, so that John can delete them himself if necessary. John wants to check his personal home directory (drive H:) for viruses. To do this, John needs to perform the following steps:
- Open the Sophos Anti-Virus user interface. (Right-click on the taskbar icon next to the clock. Left-click on "Open Sophos Anti-Virus").
- Left-click to open "Set up a new scan
- As name John enters "Check John's data“
- Check the H: drive, uncheck all other boxes by left-clicking.
- By default, Sophos Anti-Virus does nothing if it finds an infected file, so there is no need to open the "Configure this scan" option
- The scan should start right away, so the "Save/Start" button is used to finish the setup.
Check files downloaded from the Internet and delete them right away in case of virus infection
User Jane Doe regularly researches for her studies on the Internet and downloads digital magazine articles, images and audio files from various sites. However, before she sifts through the files and puts them in her personal home directory on drive H:, she first saves everything on the local hard disk D: in the directory temp and there in the subdirectory. After the search is finished, she checks this folder for viruses. Infected files should be deleted immediately.
- Open the Sophos Anti-Virus user interface. (Right-click on the taskbar icon next to the clock. Left click on "Open Sophos Anti-Virus").
- Left-click to open "Set up a new scan
- As name Jane enters "Check Jane's research material".
- By clicking on the + symbol at drive D: and D:\temp the directory jadoe becomes visible, where she makes a check mark.
- Found infected files should be deleted, so Jane opens "Configure this scan" and selects “Delete” in the "Cleanup" tab under both "Viruses/spyware" and "Suspicious files"
- In the "Options" tab, she checks "Archive files", "Scan all files", "Scan for AdWare/PUAs", if necessary, and selects "Normal" for Scan intensity in any case.
- Jane closes the window with "OK".
- She will need the check later, so Jane finishes the setup with the "Save" button.
Configuration of checks
The setting options for manual scanning of files and directories via the context menu and for customized custom computer and directory scans are the same. The settings window for manual scanning is opened via the menu item "Configure -> Right-click scanning". The settings window for custom scans is opened via "Edit" in the list window of the user interface. More detailed information can be found in the respective chapters.
In the settings window there are the two tabs "Options" and "Cleanup". The Options tab allows you to specify which files are scanned by Sophos Anti-Virus. The "Cleanup" tab is used to specify how the virus scanner deals with any infected or suspicious files it finds.
Settings available in the Cleanup tab:
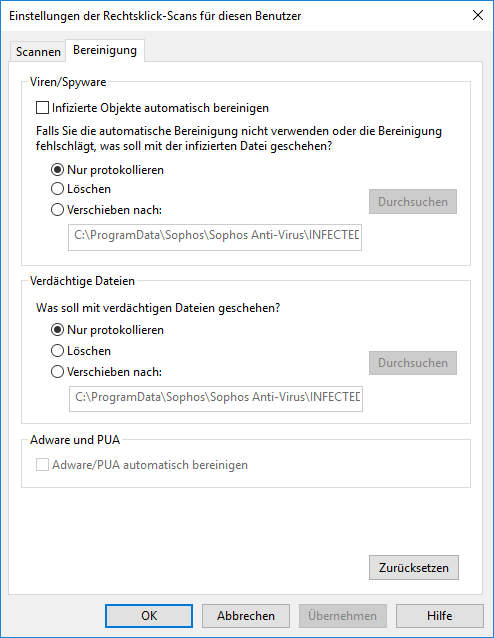
Viruses/spyware
- Automatically clean up objects that contain viruses/spyware
Cleaning means that it tries to clean the file from malicious code.
(Only recommended if you do not have a clean backup copy of the file). - Delete
This option removes the infected file from the computer permanently (Attention: There is no further security prompt).
Alternatively, you can simply delete the files using Windows Explorer. - Move to
Sophos Quarantine mode leaves the file in place by default. This option can be used to move infected files to a collection folder, for example.
(The security setting of the University Computer Center installation does not allow normal users to move infected files, so this option should not be selected).
Suspicious files
Suspicious files are those that are not classified as virus/spyware, etc., but only as "potentially unwanted". This includes adware or dialers, as well as some system management programs, some of them of obscure provenance, which are classified as hacking tools. If a program you need is classified this way, please contact your system administrator or IT representative of your institute or department.
The options for cleanup are the same as for viruses and spyware.
Setting options in the "Scan" tab
- Scanning intensity
In principle, "Normal" should be selected here. - Scanning options
- Scan archive files
Determines whether files in e.g. .zip archives are also scanned (Recommended). - Scan for Macintosh viruses
If you are dealing with Apple computers, this option should be selected. - Scan all files
Sophos normally only scans a list of known file types, this setting will scan all files found without exception (Recommended). - Scan for adware/PUAs
Also scans files that are not considered viruses but are potentially unwanted applications (recommended). - Scan for suspicious files and rootkits
This setting requires administrator privileges and is therefore not recommended for normal users.
- Scan archive files
Automatic updates
If connected to the Internet or UMRNet, Sophos Anti-Virus will update automatically, i.e. the program and the Virus signatures are kept up to date. For this purpose, the update component regularly (default: hourly) accesses a server in the University Computer Center and determines whether new data is available there. Sophos publishes new virus signatures several times a day and, if necessary, major program updates that are installed automatically.
It does not make sense to use a virus scanner without regular updates, as this does not guarantee protection against current viruses.
Monitoring the health of the virus scanner
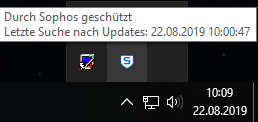
The health of Sophos Anti-Virus is indicated by a shield icon in the system tray:
- On-access scanning inactive
When on-access scanning is inactive, a yellow warning icon is displayed above the virus shield icon. - Auto Update failed
If the last update failed, a red error icon is displayed above the virus shield icon.
If a red error icon is displayed above the virus shield icon, it may be because no contact can be made with the update server, but it may also be due to problems with the installation of the update. Unfortunately, Sophos Anti-Virus does not provide an easy way for normal users (users without administrative privileges) to find out the reason for the error. Therefore, only general advice can be given at this point:
- Make sure that the computer is connected to the Internet.
- In exceptional cases, there are problems with updating the software. In this case, it is recommended to start the update again at a later time (right-click on the virus shield icon in the taskbar; select "Update now" in the context menu).
Advanced or curious users can consult the log files located in the C:\ProgramData\Sophos\AutoUpdate\Logs directory on computers installed by the University Computer Center. The file names are composed of the form "ALUpdate<creation date>T<creation time>.<internal identifier>.LOG", where the file with the most recent date is the current one. The log is readable with any text editor (e.g. Notepad). Current entries are always located at the end of the file.
False alarms or viruses that are not viruses
In rare cases, the virus scanner incorrectly detects a virus infection in a file and places it in quarantine, which means that the file is blocked for use (so-called "false positive detection"). In this case, please contact the system administrator of your institute, department or institution.