Main Content
Installation and connection setup of a VPN connection on Linux
Entry requirements
- You have the login credentials for your university account (Staff or Students).
- Operating system: Your device should be up to date, i.e. all updates should be installed.
Download and installation
To ensure the OpenConnect capability of the Gnome Network Manager, the corresponding packages for OpenConnect must be installed via the Software Package Manager of the Linux distribution.
For Debian and Ubuntu, install the network-manager-openconnect and network-manager-openconnect-gnome packages:
1. Make sure that your device has an active Internet connection for the installation.
2. Start a terminal (command line).
3. Then enter one of the following commands in the terminal. For newer distributions based on Debian:
user@linux:~$ sudo apt-get install network-manager-openconnect-gnome
The following applies to older Debian-based distributions:
user@linux:~$ sudo apt-get install network-manager-openconnect
4. Then enter the password for your Linux account on the device, press <Return> or <Enter> to execute the command with administrator rights.
5. After a few seconds, the installation should be complete.
Settings of the VPN connection
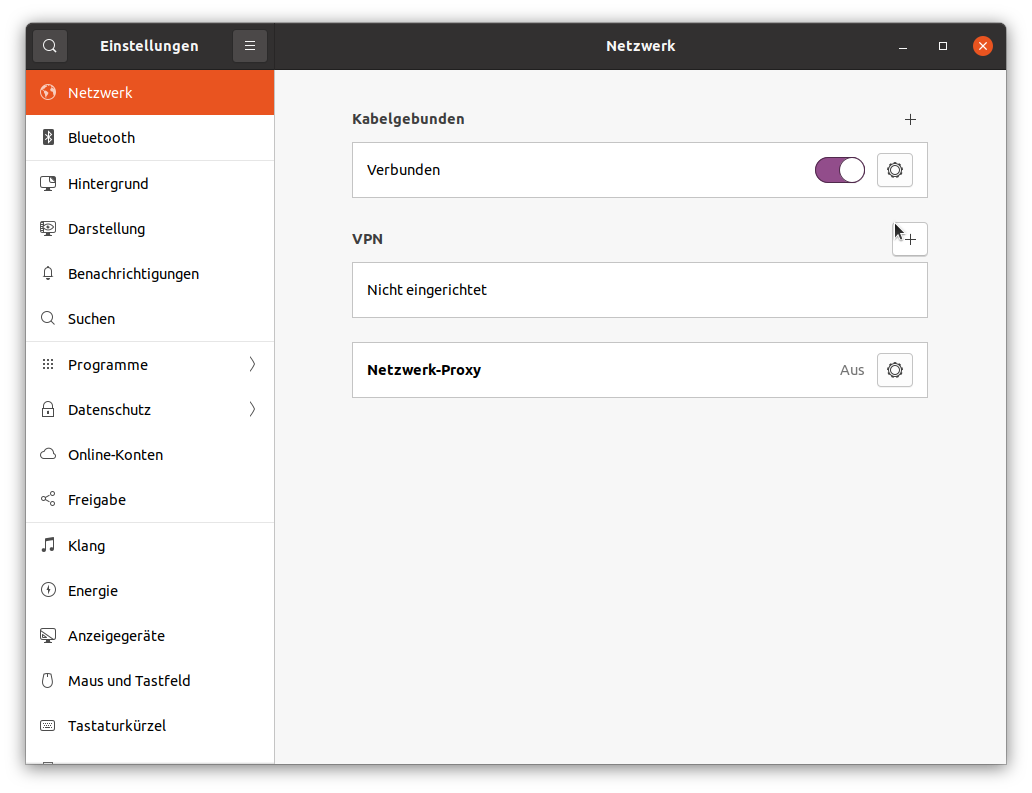
1. Select Panel → Network → Settings.
2. In the Network dialog, select + to set up a new VPN connection.
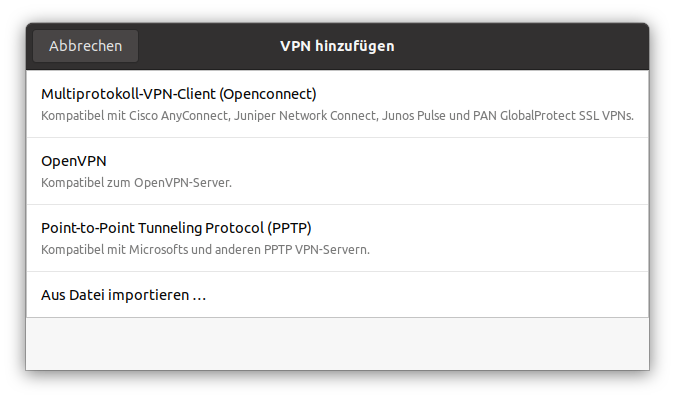
3. Select the VPN client in the "Add VPN" dialog. Select Multiprotocol VPN client (Openconnect) as the type.
4 In the "Add VPN" dialog, enter the following information in the "Identity" tab:
- Connection name: VPN Uni Marburg
- Gateway: vpn.uni-marburg.de
5. Confirm the settings.
Establishing a connection
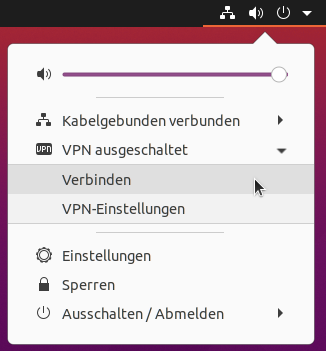
1. Under Panel → Network, select the Connect option to establish the VPN connection you set up previously.
2. Then select the appropriate user group and enter the username, password + the two-factor authentication App-token or TAN-token of your account. Then click on "Ok". Confirm the welcome message by clicking on "Accept."
- Example: Password+Token = S!ch3r3sPW + 987654 ➔ S!ch3r3sPW987654
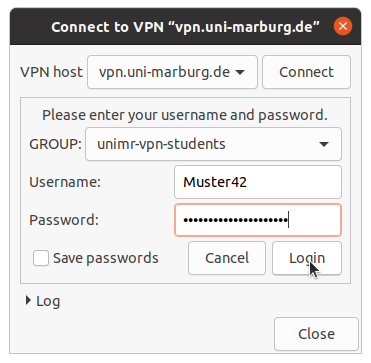
3. The login window disappears when the connection is successfully established.
Establishing a connection with a terminal (command line)
The instructions described above do not work correctly on some computers due to an error in a required utility program. In this case, please use the command in the terminal (command line):
- Staff: user@linux:~$ sudo openconnect --authgroup=unimr-vpn-staff-Password+2FA -u username vpn.uni-marburg.de
- Stundents: user@linux:~$ sudo openconnect --authgroup=unimr-vpn-students-Password+2FA -u Username vpn.uni-marburg.de
Replace username with your staff or student username. Please use your regular staff/student password as the password, but immediately add a second factor The program continues to run in the terminal and remains in the foreground, the terminal must remain open. CTRL-C terminates the process and the VPN connection.
If the connection does not work, please contact the helpdesk team:
e-mail: helpdesk@hrz.uni-marburg.de
phone: +49 6421 28-28282
Please include your username (uid) when making inquiries.
All contact points for help and advice can be found at:
https://www.uni-marburg.de/en/hrz/help-and-advice/contact-points
Troubleshooting
Problem Possible causes and solutions After the connection attempt, OpenConnect reports "Failed to open tun device" The TUN/TAP kernel module has probably not been loaded. You can reload the kernel module manually with the command sudo modprobe tun. Then try to connect again. To ensure that the kernel module is loaded automatically in future, add the tun entry to the /etc/modules file. Access to the publisher's server works, but some internal university services (e.g. network drives, CMS, printers) are not accessible There is probably an address conflict. If your router at home assigns an internal IP address of the form 192.168.x.y with x ≥ 1, address and routing conflicts may occur in principle, as these private addresses (except with x=0) are also used in the UMRnet. Configure the DHCP server of your router so that it assigns addresses of the form 192.168.0.y or other private addresses. Individual website/magazine/database is not accessible 1. Close the web browser completely, restart the PC if necessary.
2) Start the VPN client and establish the connection.
3. Start the web browser.
4. Delete the browser cache.
5. Open up the page again.
As of: 2025-06