Main Content
Example of use (Cryptomator x next.hessenbox)
If you work with particularly sensitive data, it may be advisable to protect it further by encrypting it. We will guide you step by step through the encryption process with Cryptomator in combination with next.hessenbox. On the encryption topic page, you will find all the information you need about which data needs to be protected and what you need to bear in mind.
Note: Cryptomator can also be used on its own; in general, data requiring high or very high protection should be encrypted.
Requirements
- Central user account (university account)
- Cryptomator app installed (kiosk/online)
- Nextcloud Files client app installed (kiosk/online)
Procedure
- Step 1: Start menu
- Step 2: Add new vault
- Step 2.1: Set storage location
- Step 2.2: Verification
- Step 2.3: Set password
- Step 3: Unlock vault
- Excursions
Step 1: Start menu
First, launch Cryptomator. Your existing vaults are displayed on the left, and the information for the selected vault is displayed on the right. At the bottom left, you can create new vaults using the ‘(+)’ button, view notifications using the bell icon, and configure additional settings using the gear icon.

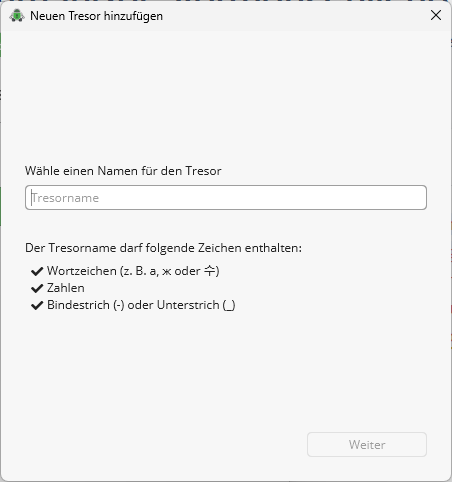
Step 2: Add new vault
To create a new vault, click on ‘(+)’. First, specify a name for the vault. This will then be displayed in the list, as shown in the screenshot in step 1 (e.g., “test_max”).
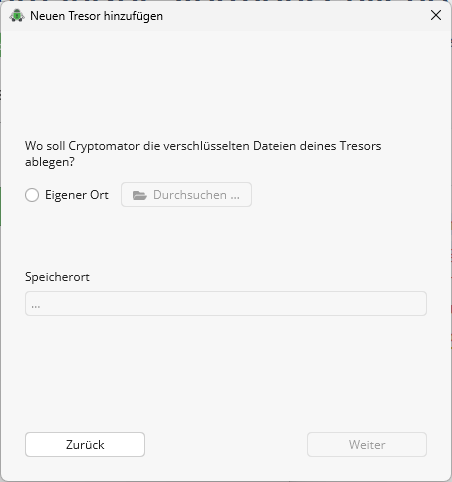
Step 2.1: Set storage location
This step is important for integration into next.hessenbox. When setting up the Nextcloud Files client, a synchronization folder is created on your computer. To synchronize the data encrypted in the vault, you must select the storage location of the Nextcloud synchronization folder.
Step 2.2: Verification
Check the name of your vault and the storage path. You can ignore the expert settings. Then click ‘Next’.

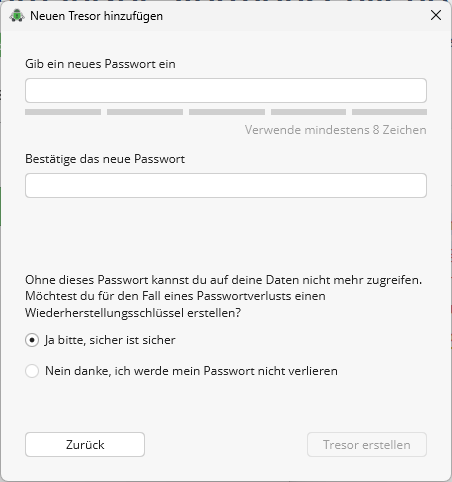
Step 2.3: Set password
Now choose a secure password. Please note the password guidelines, which provide a good basis for secure passwords. You can also create a recovery key. This allows you to set a new password even if you forget your password. Store your recovery key in a secure location, such as a separate database in KeePassXC, and keep it separate from your password.
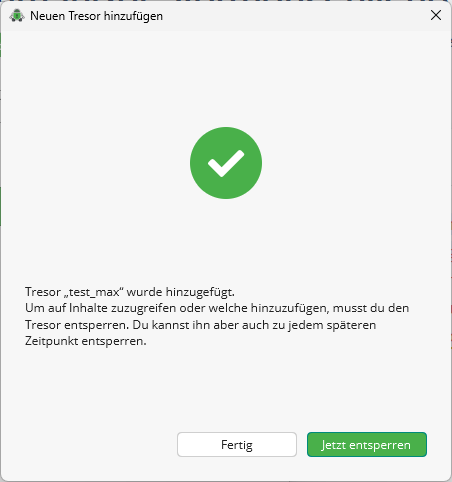
Step 3: Unlock vault
The vault has now been added and you can unlock it with your password. When a vault is locked, no data can be read or changed. You cannot move encrypted data in a locked vault to another folder. To do this, you must first unlock the vault.
Note: Remember to lock your vault after use! You can also set an automatic lock via the vault options.
Excursions
Excursus: Changing the file path of the vault afterwards
To change the file path of the vault afterwards, the vault folder must be moved to the desired location in the file browser (e.g., Windows Explorer). The Cryptomator user interface will then display a message indicating that the vault can no longer be found. Select the option “Change vault location...”. Clicking on this will take you to Windows Explorer. There, you will need to search for the “vault.cryptomator” file within the vault folder. Selecting this file will change the file path of the vault.
Excursus: Sharing encrypted files/vaults
You can share your vault with other people. While unencrypted folders or files can be accessed via sharing in the browser or in the Nextcloud client, encrypted vaults require the password to be shared and the Nextcloud client to be used in all cases. You can find more information about file sharing under Frequently Asked Questions on the FAQ page of next.hessenbox.
Background: The Nextcloud client is required for sharing and simultaneous editing of vaults. It creates a folder in which the data from the cloud is created and synchronized as linked local copies, i.e., a local change leads to a change in the file in the cloud. Without this function, several steps would be necessary to be able to edit encrypted files together."
If you have any serious problems or questions regarding encryption in next.hessenbox, please contact us at:
This text was translated with the help of machine translation software.